Sunday, 27 March 2022

Butterflies And A bird Of Joy


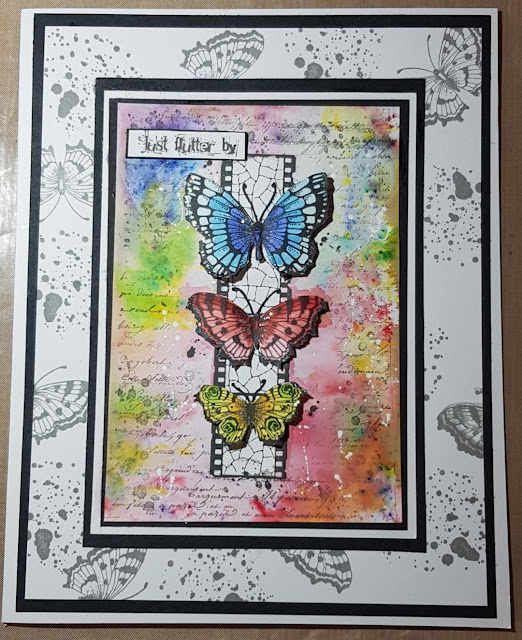
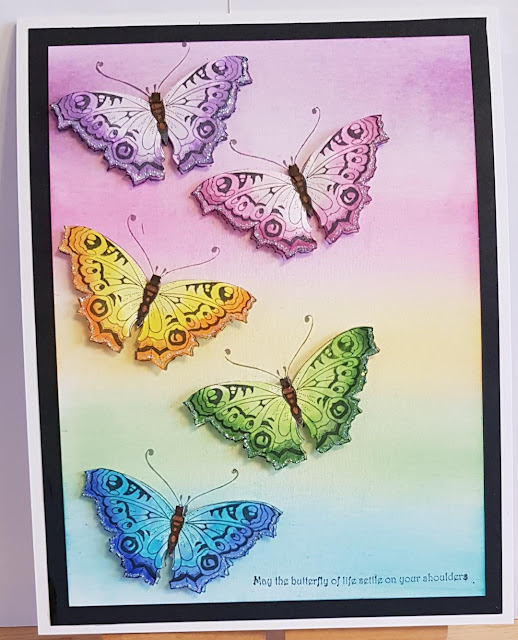
This is my final post for this month, sharing some of my makes for February's TV shows for Chocolate Baroque.  The above creation is using the Butterfly Mind's set,  so I started with the base card/background, I used stamps from the set and a Versafine Clair Morning Mist ink pad so it was subtle.  I randomly stamped with a butterfly and the splodges.  For the main image I stamped it then masked it, I used Brusho's to colour the background sprayed with water.  For the Butterflies I stamped some separate and coloured and fussy cut them to decoupage onto the main image.


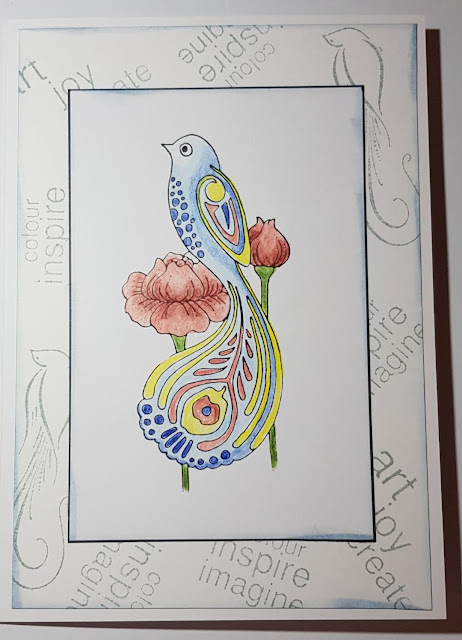
My next creation is using the Bird Of Joy stamp, which I coloured with pencils, and inked around the edges.  For the base I took the sentiment stamps Words Of Comfort And cheer, and stamped some of the words and a bird from the set, in morning mist ink, then edge the card in ink.  A simple card but I wanted to really show the bird off.

Stamps - Chocolate Baroque - Butterfly Mind  Bird Of Joy
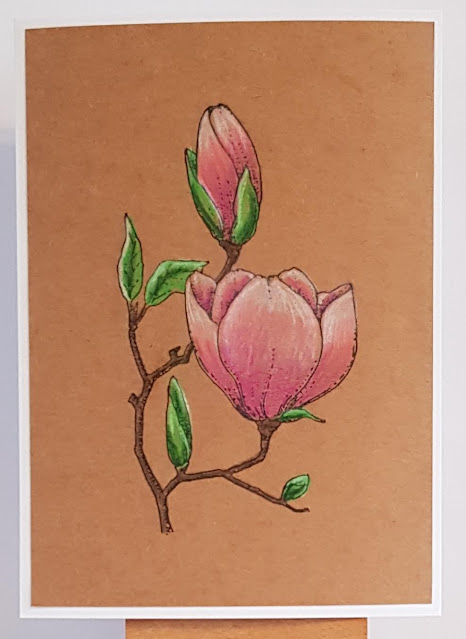
Colouring Mediums - Distress Oxides, Distress Inks, Versafine Clair, Faber-Castell Pencils, Brusho's 
Embellishments - Glitter, 

Thank you for looking
Happy crafting
Tracy x

Thursday, 17 March 2022

Vintage & Bright's

This is my second post for this month, showing some of my Chocolate Baroque's creations from  February's shows.  So let's start with the one above using the seed pod from the stamp set Glorious,  I love this card and loved the process too, my base layer is made using Distress Mica Sprays in three colours , wow does it shimmer.  Then for my main layer I stamped the seed pod onto some Chocolate Baroque's super smooth stamping card, then masked it.  Using Distress Oxides I smooched a background in three colours.  Removing the mask I coloured the image with pencils.  I stamped one of the leaves from the set in second generation around the image randomly.  I stamped out some words from the set, cut them out and inked the edges and adhered them to the card.  I just love the mica base card and then the vintage colours, they suit the seed pod so well I think.

So for my Notelet set I used several of the background stamps.  I used Square Bubbles, On The TilesLarge Crackle and also I used the Butterfly Mind set and Words Of Comfort & Cheer.
My front cover is created by inking in three colours onto card, then I stamped the crackle background  to cover the whole of the background, then with a white gel pen I highlighted randomly along the lines.  I stamped a sentiment and a butterfly which I cut out but left in black and white for contrast against the bright colour of the background.


Now for the inside of the folder, I created a pocket on one side and layered a backgound on the other side.  Added a sentiment to one side then put some notelet cards which are below and matching envelops into the pocket. 


I created three Notelet cards and three matching envelopes, For each card I used each background stamp over an inky background made using Distress Oxide.  On each card I added detail with gel pens to give interest.  I added sentiments and butterflies to each one.  For the envelopes I stamped in grey the background stamp all over each one.

I will be back near the end of the month with another post

Recipe:-
Stamps - Chocolate Baroque - Glorious, Square Bubbles, On The Tiles, Large Crackle Butterfly Mind  Words Of Comfort & Cheer.
Papers - Chocolate Baroque's super smooth stamping card
Colouring Medium - Distress Inks, Distress Oxides, Distress Mica sprays, Versafine clair, 
Tools - Sino Gel Pens, 
Embellishments -


Thanks for popping by.
Happy crafting
Tracy x

Friday, 11 March 2022

Some Bunny Loves You!


Hello lovely people,  thought I would share my creation with you, and this was made for my Mum for Mother's Day.   I started with a Lavinia Gel plate the Squarelee, I brayered and sponged some Colorbox inks onto it to create my background, and using a Lavinia moon mask I created a moon and then stamped some tiny stars.  I stamped my Hares next, then built up my scene with foliage stamps.  I could not give this to my mum without Fairies on as she loves them so on went some Fairy Foragers.


I'd like to enter this into the following challenges:
1. Cupcake Inspirations - #539 - Pet

2. Simon Says Stamp Monday - Add some Green

3. Dragonfly dreams - March Challenge - Something To Make You Smile (Hares and Fairies always make me smile)


Recipe:-
Stamps - Lavinia - Fairy Foragers, Wild Hares set, Silhouette Foliage set, Meadow Grass, Silhouette grass, 
Colouring Medium - Colorbox ink, Distress Oxides, Versafine Clair, Posca pens, Charcoal pencil, Sakura gelly roll pen, Signo gel pen, 
Tools - Lavinia Squarelee gel plate, Hill masks, Moon masks, 

Thanks for popping by.
Happy crafting
Tracy x

Saturday, 5 March 2022

Glorious Floral Delights


This is my first post for this month using the fantastic stamps that were shown on one of the February's shows for Chocolate Baroque.  So first I would like to show a book I created using the following stamps - Mosaic FlowerBird Of JoyFloral DelightWish Flower and Glorious.
So all my images were layered onto black card and added to the book, for the front cover I stamped the Mosaic Flower but upside down so it looked like the Chinese lantern plant, I stencilled in the background and coloured the image with pencils.  I added the words and did some highlights with a white gel pen.


The above pages and the ones below were done very much the same as the cover, only when I did my stencilling I masked down each side and only stencilled in the centre.  I wanted to stamp my images to the side for a different look and to get the benefit of the stencilling.  Each image was coloured with pencils in co=ordinating colours to the stencilling.  

For my next creation I made a large tag, using a die I cut the tag set which is a base, top layer and the eyelet covers.  


I coloured the base tag in Distress Oxide in a matching colour to the the colours in the top layer.  The top layer I smooched several colours for the background, then using the Butterfly Mind stamp set I stamped the main image, then stamped again on spare card, coloured the butterflies then cut them out.  On the background I added words from the set and splatters too.  I added the Butterflies, decoupaging onto the main image.  And finally some glitter was added to the Butterflies.

I will be back later in the month with some more creations from the Chocolate Baroque show, thank you for taking a look.

Recipe:-
Stamps - Chocolate Baroque - Butterfly Mind  Mosaic FlowerBird Of JoyFloral DelightWish Flower and Glorious.
Colouring Mediums - Distress Oxides, Distress Inks, Versafine Clair, Faber-Castell Pencils, 
Tools - Signo gel Pen, Lavinia Stencil, 
Embellishments - Glitter, 


Thanks for popping by my blog.
Happy crafting
Tracy x

Friday, 25 February 2022

Foxy Bees


Hello, this is my final post for this month for Chocolate Baroque, and I have decided to use one my favourite stamp sets Honey Bees.  So I started by laying down some subtle colour in blue and green for the background.  I stamped the foxgloves at various heights, and coloured with watercolour pencils. I did some highlighting with a gel pen, I added my bees colouring in the same way.  I added glitter to the wings and a sentiment.
Finally I did dots with a glue pen in and around the foxgloves and added some fine glitter.

Recipe:-
Stamps -  Chocolate Baroque -  
Honey Bees.
Colouring Mediums -  Distress Oxides, Faber-Castell pencils, 
Tools -  Signo  gel pen


Thank you for popping by
Happy crafting
Tracy x

Monday, 14 February 2022

Metallic Rose


Hello I'm back with another post for Chocolate Baroque showing you another fantastic stamp set, this time I have used Harlequin Rose.  This was one of the first stamps I bought from Chocolate Baroque and absolutely love it.  I love yellow roses, so went with that colour for this, I started with smooching DI squeezed lemonade over the image, then coloured the image and built up with various shades for depth.  I splattered with white and gold Posca pens.  I layered it onto a background I made with metallic paints from Chocolate Baroque, I just did a thin wash then sponged on thicker paint in three colours.
I love the effect of the paints and need to get them out more often.

Recipe:-
Stamps -  Chocolate Baroque - 
Harlequin Rose
Colouring Mediums -  Distress Inks, Distress Oxides, Cadence Metallic Paints, 
Tools -  posca pens,


Thank you for  popping by, see you at the end of the month with another creation.
Happy crafting
Tracy x

Saturday, 5 February 2022

Thistle Butterfly


This is my first post for February for Chocolate Baroque, and I have picked one of my Favourite stamp sets Thistle Butterfly.  So I went for a layered up look on this one, I started by stamping the image onto a light smooching of Distress Oxides.  I coloured the image with Distress Inks and decoupaged the Butterflies, and around the edge I used some gilding wax.
I did three more layers Gilding each one around the edge after smooching with Oxide inks.  The final layer I stamped with Distress Ink in my all time favourite colour, Seedless Preserves using the Large Crackle Background.

This is for the following challenges:-
1. Creative Knockouts - #438 - Lots Of Layers
2. Crafts Galore Encore - #96 - Anything Goes
3. Creations In Pink - #42 - Anything Goes In Pink

I will be back later in the month with another Chocolate Baroque creation made for you to see.
Happy crafting
Tracy x

Friday, 28 January 2022

From Gold To Bold


I'm back with some more of my creations that I made for the shows on The Craft Store for Chocolate Baroque in December, we had so many stamps to work with and they were all very inspirational.  My first card I created using Ophelia, I did the background first with rich bold colours in Distress Oxides, which I carried over into the collar and the flowers in Ophelia's hair, the flowers were decoupaged and a pearl added to the centre of each one.  The sentiment I got from the stamp set also on the shows The Folk Art Garden..


Now to create this next one I kept it simple to get an elegant effect.  I stamped my image Song Thrush and coloured it with just a gold gel pen, which just left the matting and layering to do in gold and black card.  That's it, it really was an easy creation but I love the finished look.

Recipe:-
Stamps -  Chocolate Baroque - Ophelia The Folk Art Garden.. Song Thrush
Colouring Mediums -  Distress Oxides, Faber-Castell pencils, 
Tools -  posca pen, Signo gel pen gold, 
Embellishments - peals, 

Thank you for popping by
Happy crafting
Tracy x

Sunday, 16 January 2022

Teeny Weeny Meadow Arrangements


Hello again, I'm here to share with you some more creations made for the December's shows at The Craft Store for Chocolate Baroque.  
For the first one using Teeny Weeny Meadow stamp set, I created a circle of subtle colour as a base for the stamps.  I stamped different leaves/foliage stamps in different colours creating a Wreath.  I added red berries with a Gelly Glaze pen.  I stamped a sentiment from the Holly Script set, into the centre of the wreath.  Then I matted and layered in contrasting colours.

I thought a nice snowy, frosty scene for my second creation to show the stamps versatility and that they can be used foe all seasons.  So I started by stamping the house from Patchwork Landscape, and colouring it in blue tones, I then stamped the Teeny Weeny Meadow stamps in the foreground in blues and white embossing powder for that frosty and snowy effect. Using a hill mask I created some snowy hills, and with embossing powder I created snow on the house and trees.  I added glitter for some frosty sparkle to finish off.

Recipe:-
Stamps - Chocolate Baroque - Teeny Weeny MeadowPatchwork LandscapeHolly Script
Colouring Mediums -  Distress Oxides, Distress Inks, Versafine Clair, 
Tools - embossing powder, Versafine Mark, Hill mask, 
Embellishments -  Gelly glaze pen, glitter, 

Happy crafting
Tracy x

Wednesday, 5 January 2022

Reflections & Meadows


Hello and Happy New Year, this is my first post for this year, and I'm bringing you some creations I did for the December's shows at The Craft Store for Chocolate Baroque.  We had some fabulous stamps to work with as you can see.  My first is using the stamp The Folk Art Garden, it is a very big and detailed stamp and fantastic to colour.  After I had stamped the image I coloured with Distress Inks, keeping the tones in Vintage shades.  I then stamped the image again, only colouring the butterflies and flowers.  I fussy cut them and decoupaged on to my image, I inked around the edge with Distress ink and then layered onto contrasting card.


For my second creation I used the Teeny Weeny Meadow stamps,  so I started this one by putting some colour down on to my card with Distress inks in blues, greens and browns.  I stamped my trees in Versafine Clair and as I did the main image I did the reflective image using a Gel Plate.  I mixed and blended my colours for the trees to give some dimension.  It just needed to be matted on some dark green card and it was done.

Recipe:-
Stamps -  
Teeny Weeny MeadowThe Folk Art Garden

Colouring Medium - Distress Oxide inks, Versafine Clair, Distress inks, 
Tools -  Gel Plate, 


I will be back around the middle of the month to share some more of my creations from the shows.
Thank you for popping by
Happy crafting
Tracy x

Tuesday, 4 January 2022

Revamp A Planner Lavinia Style

 Hello lovely people,  I made several Diaries and Notebooks for Christmas pressies for family members and thought I would share one of my creations with you!  This is a Planner/Diary my sister asked me to make for her.  She had quite a  brief such as locked in sparkle so it didn't shed in her bag, a colour palette of her preferred colours, a pocket in the back and a matching back cover.  She did provide me with the planner she wanted altering, so there is photo's below of what I did.

So using the planner below, as you can see I painted the spine in metallic Acrylic paint before covering the front and back cover.


I started by doing some backgrounds using sprays (see recipe below for a full list of products), I made sure the front and back covers matched with the same colours.  So then doing the front I created a moon using some Gesso, I stamped my main images in Versafine Clair ink, once they were in place I started adding the hills by using a mask and the foliage and trees.  Once my scene was set I added highlights and then lots of sparkle.  The back cover was created pretty much the same way.  To seal in the glitters I sprayed each one in Crafters Companions Spray and Shine.  Here's the back cover:-


I hope you all have a nice relaxing day, I've got to get my son ready to go back to school tomorrow, starting with a haircut.

I'd like to enter this into the following challenges:
1. Simon says Stamp Monday challenge - Something New - (new Distress Mica Sprays, Lavinia stamps)
2. We Love 2 Create - #1 - Anything Goes
3. A Perfect Time To Craft - #1 - Anything Goes
4. The Fairy & The Unicorn -  # January - Anything Goes


Recipe:-
Stamps - Lavinia - mini maple leaf, tree branch, bluebells, fairy bugs, mini berry, meadow mushroom, Jaylar, toadstool, fairy fir tree, thistle, bramble, skeleton tree scene, silhouette foliage set, meadow grass, star blossom, Aurora,
Colouring Medium - Cadence metallic paint, Dylusions sprays, Distress mica sprays, Versafine Clair, posca pens, gesso, Distress oxide sprays, 
Tools -  signo gel pens, sakura glaze pen, Lavinia hill and moon masks, Crafters Companion spray & shine, 
Embellishments - Lavinia Eco glitter, glamour dust,  


Thanks for popping by.
Happy crafting
Tracy x

Monday, 27 December 2021

Kraft Magnolia & A Harmony Notelet Set


This is my final post for this month and this year here for the Chocolate Baroque blog.  So the last of my creations from the Novembers shows, I love using Kraft card especially to colour on.  I stamped the Magnolia's from the Happy flower's day stamp set,   I coloured with Aqua Pencils, directly on to the Kraft card, but I didn't apply the water to the pencils as I liked leaving the strokes in there.  It was just that simple, but I love it!


Unlike the card above this notelet set isn't quite so simple.  I always start by creating the folder first, with a pocket on the inside to house the notelets and the envelopes..  I created the front using the Harmony Tree stamp set, distress oxide inks and the splatters from the  Numerology stamp set.  I coloured the tree with pencils, and added a ribbon.  I like to decorate the inside flap too, and I did that using the Remembrance Tree stamp set,  then as you can see using a selection of the stamps I have already mentioned I inked, stamped and created notelets and matching envelopes, all using the same method.

I hope you have enjoyed looking at my creations
Happy Crafting
Tracy x

Friday, 17 December 2021

Autumn Time & A Subtle Butterfly


Today I am sharing some more creations made for the November's shows for Chocolate Baroque.  For my first card I used Distress Oxides to make my background, simply by applying the ink to my glass mat, spraying with water and smooching my card into it.  I left the top right hand corner white to break it up a bit, and for a place to add my sentiment which is from the Harmony Tree set.  I stamped the large tree from the stamp set Trees A crowd, using some oxide I coloured in some grass around the base of the tree.


For this creation I did something a little different to my normal style, I really enjoyed playing with this technique which I was inspired to do after watching Lesley's workshop on shading with pencil.  So I started by stamping the Butterfly from the stamp set Happy Flower's Day  I shaded the butterfly using just normal HB pencils, then using a stencil and Distress Oxide inks in several colours created a background.  It's a very clean and simple card, but effective.

Thank you for allowing me to show you my cards, I will be back towards the end of the month with some more.

Thank you
Happy crafting
Tracy x

Wednesday, 8 December 2021

Have A Merry Vintage Christmas

 Hello everyone,  I found some time to create some Christmas cards  with some images from Crafty Individuals that I've wanted to use for ages, they just sing Vintage to me so that was the path I went down.  And I love Kraft card with Vintage so I thought that I would stamp on it.

So I started by stamping CI-327 Waiting For Santa on Kraft card and colouring with Faber-Castell pencils,  I set it onto a die cut frame which I had inked.  The background card was blended with Distress Oxide inks.  I cut some Poinsettia's in Kraft and used pencils to add colour, I embellished my card with gingham ribbon and a little gold stickles.

I'd like to enter this into the following challenges:
1. The Cutie Pie Challenge - #165 - Anything Cute
2. Crafty Calendar Challenge - December - Christmas

I enjoyed making the above card so did another with a different image, I used CI-399 Winter Wonderland from Crafty Individuals this time


I'd like to enter this into the following challenges:
1. Dream Valley Challenges - #260 - Christmas


Recipe:-
Stamps - Crafty Individuals - CI399 - Winter Wonderland, CI-327 - Waiting For Santa, Sentiment - Flonz, 
Colouring Medium - Distress Oxide inks, Faber-Castell pencils, 
Tools s- Spellbinder Dies - Timeless Rectangle, Layered Poinsettia, 
Embellishments - Stickles, Gingham ribbon, 


Thanks for popping by.
Happy crafting
Tracy x

Sunday, 5 December 2021

Rainbows & Reflections

  I would like to share a couple of creations I did for the November Craft Store shows for Chocolate Baroque


My first creation is all about reflection. I took the Trees A Crowd stamp set and selected some of the trees, I did a waterline so I could line my trees up, I used a gel plate to make the reflections, then I just built up the colouring creating the scene.  I die cut some frames to put around my images in contrasting colours.


I loved creating this card, now I know it's not for everyone but I have to say I find fussy cutting relaxing.  So to start I chose five colours of Distress inks and then applied them with stencil brushes in  rainbow stripes.  I stamped five butterflies from the stamp set Happy flower's day, and cut them out.  Always cut your image before colouring it as the ink weakens the card and you don't get as crisper cut.  For each butterfly I took the colour from the background so for instance for the pink one I used Kitsch Flamingo, I then picked two other co-ordinating colours, Spun Sugar and Picked Raspberry to shade and colour the butterfly.  I then proceeded to do the other butterflies in the same way.
I stamped the butterfly image on the background where I wanted the butterflies positioned, then glued the cut out butterflies over the top with the wings free and shaped.  All I did then was added a sentiment from the set.

This is for the following challenges:-
1. Colour Crazy Challenge - #48 - Anything Goes
2. Critter Crazy Challenges -#57 - Anything Goes

I hope to see you later in the month for some more of my samples from the shows.

Happy crafting
Tracy x

Monday, 29 November 2021

Autumn Leaves

  I'm here with my third post for this month from Chocolate Baroque, using From Nature and Numerology from Octobers shows.

For the background on this I used four different coloured inks blended together.  I then used the splatter from Numerology to stamp over the inking.  The leaves were inked with sprays before being  fussy cut and adhered to look like falling leaves.  then all that was left to do was add a sentiment.  I stamped the word Autumn and a mini bulldog clip to the top.


Another inky background done in a couple of colours,  I then stamped leaves to one side of the card and the numerology stamp down the opposite side, then some smaller leaves floating down the centre.  I layered up a couple of sentiments from the same set and added to the card.

Happy crafting
Tracy x

Thursday, 18 November 2021

Bubbles Everywhere

 This is my second post this month showing creations I made for the October shows for Chocolate Baroque, using stamp sets Beauty Is In The Eyes and Numerology

I created this card in three layers, the bottom layer and second layer I did first, using a stencil I inked on some circles diagonally across,  then used a white gel pen to make them look like bubbles.  I stamped the image from the set Beauty Is In The Eyes on a third piece of card and coloured it using inks.  


My background on this one was created with inks and then splatters stamped on from the Numerology set.  I made another layer with ink and on to that I added a frame with the image stamped on and coloured.  I cut out some circles to add along the base of the frame.

There will be another post from me near the end of the month.
Happy crafting
Tracy x

Monday, 15 November 2021

A Butterfly Heart


Hello everyone, happy Monday to you all. This is a rare post for me as I found a little extra time to have a play this week, and hopefully will be sharing some projects soon that I will be making for Christmas gifts.

I had a fabulous time creating for the Chocolate Baroque TV show on  The Craft Store, this is one of my creations featuring the following stamps Artist Trading Heart, Happy flowers Day and Numerology.   So I started by stamping the heart in the centre, I stamped the butterfly and the sentiment on to the heart.  Using Spiced marigold Distress Oxide I blended the ink around the outside of the heart. I stamped another butterfly, fussy cut it and coloured with Distress inks.  To finish this off I stamped with the splatter stamp from Numerology. I went around the heart with some Glamour dust. Easy but effective I think.

I hope you all have a nice relaxing day, I've got samples to do for the next show.


I'd like to enter this into the following challenges:-
1. Crafty Calendar Challenge - #November - Anything Goes
2. Crafty Catz - #572 - Anything Goes with sparkle


Recipe:-
Stamps - Chocolate Baroque's -  Artist Trading Heart, Happy Flowers Day, Numerology
Colouring Medium - Distress Oxides, Distress Inks, Versafine Clair, 
Embellishments - Glamour dust, 

Thanks for popping by.
Happy crafting
Tracy x

Sunday, 7 November 2021

It's A Very Micey Christmas

Welcome, it's a new month for Stamping Sensations and We Love Stamping challenges, you might see we have had a name change,  we are all about the stamping and great prizes.

If you didn't get the chance to join in last month's challenges these could be the ones for you.

At Stamping Sensations this month the theme is 'Christmas'  and I just had to use some mice, I love these Pink Ink Designs mice, they are so joyful.  So I stamped my image first and coloured it with Aqua pencils.  The background is made using Distress inks, I covered the mice and using white acrylic paint I flicked some snow.  For the snow across the bottom I used Distress Grit paste and whilst wet sprinkled some Glamour Dust on to it for some real sparkle, which you obviously can't see.

Our Prizes and Sponsor this month:-


And there will be a second prize of a surprise goody bag which will contain a stamp, stencil or other crafting items.


And of course, the Design Team have created some stunners to inspire you. Please do pay them a visit to their individual blogs - it means a lot to know you appreciate their efforts.


And now onto my second challenge creation for We Love Stamping, where the theme is 'Christmas'  So after thinking for a bout 10 seconds what I should use for this challenge these little critters jumped out at me.  I adore this Gingerbread House, it's one of my Favourite House Mouse Christmas stamps.  I thought I would use it in a different way this time and stamped direct on to Kraft card.  I coloured it with Aqua Pencils and used a white charcoal pencil around the outside.

Our prize:-
Each month a Guest Designer will be selected from all entries and also a Top 3. We have some great prizes lined up and this month is no exception as we have four from one of our most generous new sponsors to be announced in 2022.   


Are you wanting some inspiration, pop on over to the challenge blog and then you can see all the wonderful creations from the rest of the talented team.


Recipe:-
Stamps -  Pink Ink Designs - A Christmas Carol,  House Mouse - HMOR1049 - Christmas Cottage, 
Colouring Mediums - Faber-Castell Aqua Pencils, Distress Ink, Versafine Clair,  Dylusions Acrlic Paint,  Charcoal Pencil, 
Tools - Distress Grit Paste, Signo Gel Pen
Embellishments - Glamour Dust, 

Thank you for popping by my blog.
Happy crafting
Tracy x

Saturday, 6 November 2021

Have A Mice Christmas


 Good Morning bloggers, it's Saturday morning so It's time for a new challenge today at Allsorts.

This week it is my turn to host and I would like to see 'From Boys To Men' so it just needs to be suitable for a Boy or a Man.
I decided to make my Dad a Gift Voucher card, for the last couple of years he's asked for a Morrisons gift card as he saves them then buys plants in the spring/summer to fill his garden.  So on the front I stamped my Pink Ink mouse then coloured with Aqua pencils, I then put in some snowy hills.  I stamped a fir tree, then with a posca pen I added snow to the sky and tree.  Then to finish it had to be Glamour Dust.

For the inside I did some snowy hills, added some fir trees then the snow.  I made some slits to house the gift card.  My final touch was to decorate the envelope by stenciling some blue circles then stamping the fir tree.

Don't forget to head over to Allsorts for all the details of this challenge, and to check out all the fabulous inspiration from my very talented team mates.

Here are the prizes on offer:-


Woodware stamp and sentiment set


 From


Craft Stash is the fastest growing online craft store that specialises in papercraft for card making, journaling, mixed media and much more! We have over 10,000 products to choose from and we’re constantly adding new brands and new products from around the globe.


And also 3 images of winners choice from Ruth Hamilton Design


Ruth Hamilton Design: I have enjoyed crafting all my life and have been involved in the craft industry for several years. I started drawing images to use on cards for my own use and then went on to design some stamps for a well known craft company.I am an avid lover of nature so most of my drawings are of flowers, birds and animals. Even when I can’t travel I love spending time in the garden, growing plants and looking after them. I hope you enjoy colouring my digi images, I have several YouTube vidoes here.


Recipe:-
Stamps -  Pink Ink Designs - A Christmas Carol,  Lavinia - Fir Tree, 
Colouring Mediums - Faber-Castell Aqua pencils,  Distress inks, versafine clair, Posca pen, 
Tools - Lavinnia stencil - white orbs,  Lavinia hill mask,
Embellishments - Glamour dust, 


Thanks for popping by my blog.
Happy crafting
Tracy x